

Home to my various craft projects.
Showing posts with label Home Decor. Show all posts
Showing posts with label Home Decor. Show all posts
Friday, December 13, 2013
Ornament
John and I are heading to a tree trimming party this weekend, so I made this ornament.
It was fun to make and I think I'll make some more for other people.

Thursday, October 10, 2013
New House Organization
As our new home is considerably smaller than our last place, it is really important to keep things tidy. To be successful in this task, I made myself a dry erase board will all my daily and weekly tasks.

I used a large picture frame, glued some fabric down on the cardboard backer and then added a calendar template I made from paint samples and a couple of lists.
 I separated my cleaning tasks into daily and weekly and then assigned a weekly task to each day of the week. I find that just having these lists up makes me more conscious of clutter and helps me to keep our apartment tidy.
What do you do to keep up with your daily tasks?
What do you do to keep up with your daily tasks?
Friday, April 19, 2013
Today's crafting
I have been sewing all day, that and reorganizing my scrap stash. I have way too much fabric at this point, and I am not sure how I am going to use it all. Anyway, I made a pillow case to fit an 18" throw pillow for my etsy shop. I plan on listing it tomorrow, but I thought I would preview it here first.


Monday, March 25, 2013
Here's what I've been up to. . .
I went to my mother's for a few days, and on Friday we took six hours to rip down the '70s style wood paneling in the family room. Here it is before:

 After we got the first panel down, we found some drywall in pretty good shape behind it. We thought, great, we will do a bit of spackling and paint the wall no problem. That was optimistic, at the end of the six hours we thought, we'll hire someone to do a lot of spackling and paint the wall, no problem. Here is is after:

 The room looks so much bigger and full of light now! I can't wait to see it with a fresh coat of paint.
Since returning home, I have been working on some egg dying for Easter.
 I will share the results in a couple of days.
Since returning home, I have been working on some egg dying for Easter.
Tuesday, March 19, 2013
Paper Baskets
Spring is (theoretically) on the way, and with it, Easter. Those of us living in the US, at least, no matter how hard we try to avoid it, are receiving catalogs filled with images of bright pastel clothing and jewelry. This seems a perfect opportunity to make some woven paper baskets.
 The colors are so bright, and the glossy catalogs are the perfect weight to make sturdy little baskets.
 I started off with the idea that I would just weave them and rely on the weaving to hold together, but I ultimately used a few dabs of hot glue to finish them off and make them a bit stronger.
 In a few weeks you will see the items I am making to fill these little baskets, other than the curled newsprint that is.
What do you do to upcycle those pounds of wasted paper?
What do you do to upcycle those pounds of wasted paper?
Monday, March 4, 2013
Sunny Day Sewing
I don't have much to share today beyond a bit of sewing on this beautiful, sunny day.

 There is something about drinking tea and ironing pattern pieces that I find fits with a sunny morning. Like the world is new and I am making something new myself. I am working on a few new projects, the ones pictured being brush rollups for my etsy shop. I'll let you know when they are up. Oh, and I also got a new basket from Marshalls to store my yarn in. Sure beats the cardboard box!

 I love the circular handles because I can pull the yarn through them and the ball stays put. No more balls of yarn going on walkabout!
Tuesday, January 1, 2013
Post Christmas Glee
I have been admiring this beautiful Millennium Falcon print from Harshness on Etsy for months now.
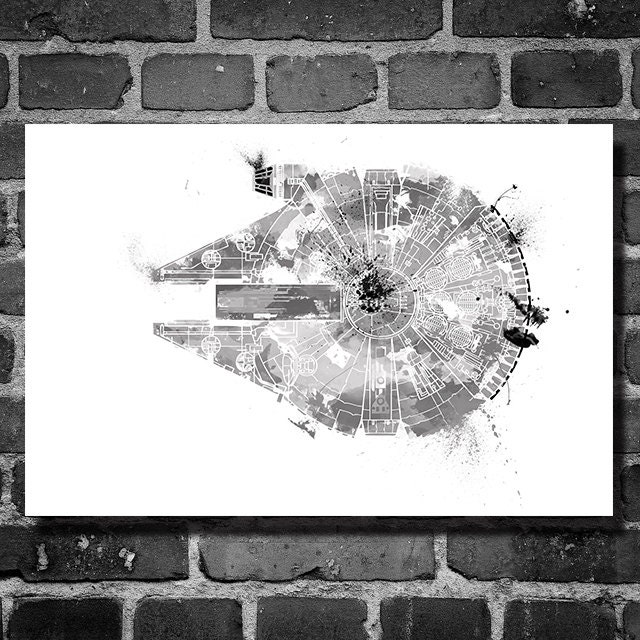 John got it for me for Christmas! I hung it over our bed today and I think it looks great.
 We are collecting quite a few geeky posters now, and some day we will have a house to put them all in. Maybe we will make themed rooms. Hmmm.
Anyway, check out Harshness' shop, they have a whole lot of really cool takes on movie posters, and they aren't even all geeky!
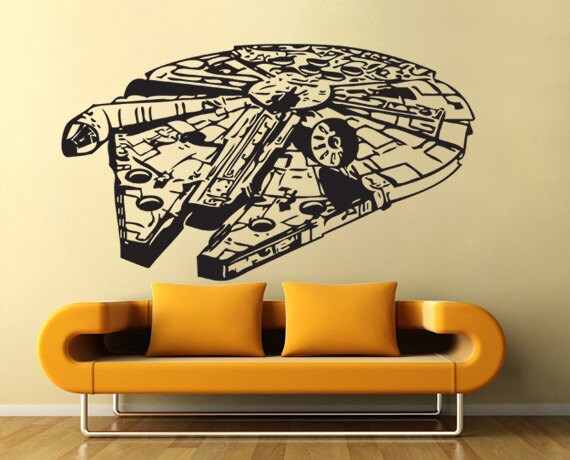
Oh, and if we do go for themed rooms, maybe this wall decal from lapoonstudio will have a place in our next home.
Anyway, check out Harshness' shop, they have a whole lot of really cool takes on movie posters, and they aren't even all geeky!
Oh, and if we do go for themed rooms, maybe this wall decal from lapoonstudio will have a place in our next home.
Wednesday, December 19, 2012
And that's done. . .
Well, I finally hung the last piece of art we got at NYCC. I wimped out and bought a frame for it instead of making one myself.
 Amazing, right?
Tuesday, December 11, 2012
Geeked out for Christmas
Having decided to make all my own ornaments this year, I realized I had the chance to really customize our tree to reflect our interests.
Our little plastic tree arrived on Saturday, and we set it up and strung it with lights before really getting down to the ornament making.
 It was fairly inexpensive because it was on sale and it is just about the right size for our small apartment. It is three feet tall and about a foot wide at the base. It sits comfortably on the side tabe next to our couch.
When I was growing up, decorating the tree was a family affair. It was a time when we could take out all the ornaments my parents had collected over the years and remember the times we all shared together. Almost all the ornaments had a story. We had either bought or made them and each one signified a time in our lives. I love that idea, and since John and I are just starting our lives together, I want to make sure we have a way to look back too. One year, when I was very young, my mother made cookie ornaments, and we each painted one (I think I was little enough that I "helped" to paint one). I thought that would be an inexpensive way for us to make our own ornaments. I looked it up, and found this recipe from allrecipes.com. Mine didn't turn out particularly flat, I don't know what I was doing wrong, but a few turned out well. On Sunday, John, his mother, and I sat down and painted them. It was a nice little family activity. We turned on Pandora's Christmas channel and told stories about Christmas past.
 John chose his favorite superhero, Batman, to immortalize in ornament.
His Batman symbol fit in really well with the Batmobile I had already transformed into an ornament. He painted the body of the ornament black and added the yellow bat symbol after the black paint dried.
I went for Superman and Captain America myself.

 I am really happy with the results and know that we can reuse these ornaments for years to come because I sprayed them with Krylon Crystal Clear, an acrylic coating that dries really fast and seals whatever you have sprayed.
Now we come to my favorite part of the tree, a Mario Star topper.
 I was not originally planning to go with the Mario Star. My plan was to just make a star out of Sculpey and paint it metallic gold. I made a disk of aluminum foil and added triangles of Sculpey, smoothing and adding extra clay until I had a white star. I added a stem of foil wrapped in clay and used a mechanical pencil to make a hole the top of the tree could fit in.
 Once I had the star, it was obvious I had to go with the Mario influence. Everytime I looked at it, I heard the little bing. I painted it yellow, adding a darker orange around the edges and a white highlight to the edges. I painted little black eyes with white highlights, and painted the stem green to blend with the tree. I sprayed it with sealer and when it was dry I tried to attach it to the tree. The top sprig on the tree was not sturdy enough to hold up the weight of this star.
 I was worried until I realize I could pop that sprig off and slide the star down onto the top of the plastic trunk. It fits perfectly and looks positively geeky.
How does your Christmas tree reflect your interests?
Our little plastic tree arrived on Saturday, and we set it up and strung it with lights before really getting down to the ornament making.
When I was growing up, decorating the tree was a family affair. It was a time when we could take out all the ornaments my parents had collected over the years and remember the times we all shared together. Almost all the ornaments had a story. We had either bought or made them and each one signified a time in our lives. I love that idea, and since John and I are just starting our lives together, I want to make sure we have a way to look back too. One year, when I was very young, my mother made cookie ornaments, and we each painted one (I think I was little enough that I "helped" to paint one). I thought that would be an inexpensive way for us to make our own ornaments. I looked it up, and found this recipe from allrecipes.com. Mine didn't turn out particularly flat, I don't know what I was doing wrong, but a few turned out well. On Sunday, John, his mother, and I sat down and painted them. It was a nice little family activity. We turned on Pandora's Christmas channel and told stories about Christmas past.

His Batman symbol fit in really well with the Batmobile I had already transformed into an ornament. He painted the body of the ornament black and added the yellow bat symbol after the black paint dried.
I went for Superman and Captain America myself.
Now we come to my favorite part of the tree, a Mario Star topper.
How does your Christmas tree reflect your interests?
Thursday, December 6, 2012
The holidays have pounced part 2
This post won't be long, but I wanted to update you on my homemade holiday decor. I have been folding origami ornaments and baking cookie ornaments, but you will have to wait until my tree post to see those. What I want to share today are my handmade stockings.
 I thought it would be nice to make a variety of color combinations. My stocking is the one on the far left. I made it first and modified my design for the top flap on the next two.
 I hand embroidered our names on the felt flaps, and I love the way they came out.
We don't have a fireplace, which is where we hung the stockings when I was growing up, so I had to improvise. It turns out our bookcase is made of softer wood than it looks like, because it was really easy to screw the cup hooks into it. I think they look great.
 I only have one holiday card so far, so it doesn't look quite as festive as I expect it will later in the season.
How do you personalize for the holidays? My mom used to write our names in glitter glue on the stockings. Leave me a comment and tell me how you like to make the holidays your own.
We don't have a fireplace, which is where we hung the stockings when I was growing up, so I had to improvise. It turns out our bookcase is made of softer wood than it looks like, because it was really easy to screw the cup hooks into it. I think they look great.
How do you personalize for the holidays? My mom used to write our names in glitter glue on the stockings. Leave me a comment and tell me how you like to make the holidays your own.
Tuesday, December 4, 2012
The holidays have pounced!

On Sunday morning I came, suddenly, to the realization that advent has begun and the time between now and Christmas is shorter than I expect it to be. This never happened when I was five years old. John and I are at that age when we have ventured out into the world on our own, but have yet to host the Christmas festivities. We alternate between our families, resulting in the fact that we have never decorated any of our apartments for Christmas. This year, that all changes. Although we are not hosting a huge Christmas party, my mother is coming for the holiday, and we will not have the opportunity to enjoy someone else's decoration labors. This age also means we will not be in our current place for more than one Christmas, so accumulating expensive decorations does not seem reasonable. To this end, I am decorating this year hand made for the most part. I considered a paper tree like this one:

But ultimately I was convinced to go with a more traditional artificial tree when I saw they were on clearance at JoAnn fabric. While it has not yet been delivered, I have been furiously making ornaments so that when it arrives, I am ready. My patience was challenged by waiting for shipping, and in the meantime I have been making other holiday accents for our home. For example, I made these throw pillow covers for our couch.


Thursday, November 15, 2012
Comic Con Loot
Walking down the artist's alley, I was struck by an oil paint set up at one booth. I stopped to look at it, and John said, "Look who it is!" It was Tom Gianni, the creator of Mechanic Anna. John and I had met him last year and fallen in love with the character and with the poster (below on the left) that we purchased last year. You remember my post.


We also found this amazing Game of Thrones poster. John is a huge fan of maps, so we grabbed it right away and it looks great.


Wednesday, September 26, 2012
Artwork
So we have been in our new place for about two months now and I feel like I am still getting settled. Many of the bedroom walls are still bare, and I am still working on getting the living area sorted as well. Since I last shared photos of the apartment, I made a fabric basket and unpacked the last three boxes into it. So that made a big difference. The project I decided to work on this week was getting our artwork matted and framed so I could hang it and fill out the empty places on our walls. We still need some artwork for the bedroom (the decals we had in the last apartment were great, but a bit expensive and labor intensive since we are only here for a year).
Anyway, I bought a sheet of mat board from the Village Center for the Arts in New Milford, CT when I was visiting my mother, some wood moulding from the hardware store, and threw together some frames. I'm really happy with the results.
 I got this really awesome poster at New York Comic Con last year from the artist, Thomas Gianni. You can check out his website here. I painted the mat black and the tapered edge copper and painted the frame copper to pull off those elements in the poster
 I also got this cool Doctor Who poster at NYCC. It is a copy of the painting van Gogh paints in Vincent and the Doctor. I chose to paint the frame and beveled edge a metallic TARDIS blue.
 I also framed this painting I had in my childhood bedroom,
 and this map of Rome for above our dining room table.
I'm slowly filling the gaps, but I imagine I'll have more art to share in the near future.
Anyway, I bought a sheet of mat board from the Village Center for the Arts in New Milford, CT when I was visiting my mother, some wood moulding from the hardware store, and threw together some frames. I'm really happy with the results.


I'm slowly filling the gaps, but I imagine I'll have more art to share in the near future.
Tuesday, September 4, 2012
Braided Rug
When I was about seven, I started to make a blue braided rug for my Amercian Girl Doll, Molly. It didn't come out so well. Now almost twenty years later I tried again. This time I did some research and it came out really well. Check it out.
 I used some more fabric sewn as a ribbon to lace the braids together.


I used denim, corduroy, and some colored cotton fabric I had left over from a previous project. I think it came out really well.

It lives on our kitchen floor in front of the sink and it is super comfy to stand on.

Subscribe to:
Posts (Atom)